
30 Days with Surface Pro: Day 5
At some point in this 30 Days with Surface Pro series, I’ll focus on its functions and capabilities as a tablet. But, first I am trying to just get it set up and use it as a traditional Windows PC here in my office.
A PC is as a PC does. It’s been many years–like 42 or so in IT years-since I have owned or used a “desktop PC”. I spent years using my Dell XPS M1330 laptop, followed by my 11-inch MacBook Air, and now this Surface Pro. The reality is that the size and shape of the physical computer are irrelevant when it comes to using it at your desk. Whether you’re using a desktop, laptop, or tablet, if you stick it under your desk and connect it with a monitor, keyboard, and mouse–or some equivalent setup–its just a PC. The Surface Pro has an Intel Core i5 processor and 4GB of RAM, and it runs the full 64-bit Windows 8 Pro operating system just like a desktop. Functionally, there’s no real difference.
Granted, there are benefits to using a desktop PC. They generally offer faster processors, better video, and more storage capacity for the buck than their mobile counterparts. They also tend to have far more ports–both variety and quantity–to connect to. But, they’re significantly less convenient when you want to get some work done from a Starbucks for an afternoon.
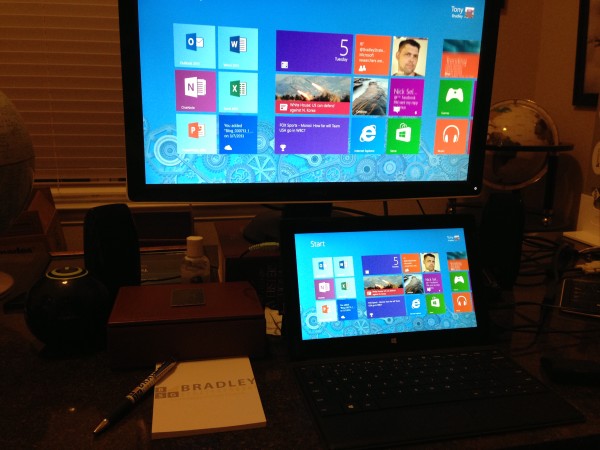
So, the point of today’s 30 Days post is to finish getting this Surface Pro set up in my office in “desktop mode”–meaning on my desk as a desktop PC, not to be confused with the Windows 7-esque “desktop mode” of Windows 8. I used the display port to HDMI adapter Microsoft included to connect the Surface Pro to my 23-inch HDMI monitor. Voila! My Surface Pro is now displayed in 23-inch glory…except for two things.
First, because there’s no docking station that I can conveniently snap the Surface Pro into (you’ll notice that being a persistent complaint of mine throughout this series) I sort of have to have the Surface Pro sitting on my desk. It’s not the most aesthetically pleasing arrangement–with the power cord and HDMI adapter flailing out of the lower right side, and a USB hub and speakers plugged into the left side. But, one thing that bugs me more than cables running every which way is the fact that the display is simultaneously mirrored on the Surface Pro and the monitor at the same time. That’s annoying.
One option would be to extend the display so it spans the two, but when one is a 23-inch monitor, and the other is a 10-inch tablet that doesn’t work so well. It works in the technical sense, but I prefer for the displays to be the same size to extend to dual-monitors. The other option–and the one I chose–is to turn off the mirroring so Windows 8 only shows up on the monitor. The display on the tablet itself is off, so it’s less distracting.
The next issue I had to deal with was the resolution. Once I switched to using only the monitor as a display, it claimed the resolution was 1920 x 1080, which seems fairly respectable. The problem is that it didn’t seem like 1920 x 1080, and it looked like crap. The icons were massive, and the images grainy. Really, it seemed as if it was still displaying at the tablet resolution even though it was connected only to the monitor and claimed to be using the much-higher monitor resolution.
I took the HDMI cable and connected my Samsung Series 7 Slate to the monitor to see how it looked. Much better. I checked the resolution, and it was the same 1920 x 1080. So, why did 1920 x 1080 from one Windows 8 tablet look awesome, while 1920 x 1080 from the Surface Pro Windows 8 tablet look like crap?
I started digging around in Windows 8, looking for some way to modify the size of the icons. I found a display setting to “Change the size of all items”. It has three settings Small (100 percent), Medium (125 percent), and Large (150 percent). However, it was already set for Small, so it wouldn’t let me choose Small and there was no smaller setting to go with.
After poking around a while longer to no avail, I finally decided to bump it to Large on a whim just to see how big Large is for comparison sake. I didn’t notice any difference. So, I set it back to Small, and miraculously everything went to the size I expected in the first place. Apparently, even though Windows 8 thought it was set for Small, and thought it was configured for 1920 x 1080 resolution, it was actually using Large and possibly even a lower resolution. By changing the settings, and then changing them back, I got it all worked out.
So, now I can sit at my desk and use the Surface Pro as a Windows 8 PC. I am still using the Type keyboard cover as my keyboard, and the Wedge as my mouse, but I am connected to the 23-inch monitor, my printer, and to my desktop speakers.
Day 4: Navigating Windows 8
Day 6: Good, bad, and ugly of Windows 8 Store
Comments
4 responses to “Surface Pro, Day 5: Tweaking the display”
[…] I don’t have to use the built-in webcam on the Surface Pro. When I’m using the Surface Pro at my desk, it’s connected to an external Logitech webcam that sits on top of my monitor. […]
[…] Surface Pro, Day 5: Tweaking the display […]
[…] Day 5: Tweaking the display Day 7: Installing software […]
[…] the Tablet Surface Pro, day 3: Logging in to Windows 8 Surface Pro, Day 4: Navigating Windows 8 Surface Pro, Day 5: Tweaking the display Surface Pro, Day 6: Good, bad, and ugly of Windows 8 Store Surface Pro, Day 7: Installing software […]